As an Amazon Associate, Modded gets commissions for purchases made through links in this post.
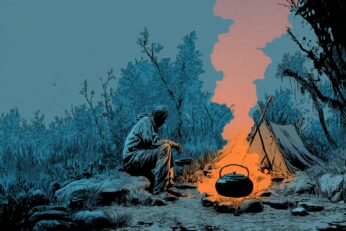
Knowing how to start a fire can save your life in a survival situation. However, even experienced outdoorsmen can have trouble starting a fire in suboptimal weather. Here’s the full guide to lighting a fire – and keeping it alight – in all weather conditions so you can impress your friends and master an essential survival skill.
Gather the Tools
A lighter and some kindling won’t be enough to start a fire in damp or rainy weather. You need some special tools to complete the job:
- Fire-starting tool: a lighter, matches, flint and steel, magnesium block or Ferro rod are all great options as your main fire-starting tool.
- Knife: you need a sharp and reliable survival knife to split fine kindling.
- Folding saw: the saw will take care of the bigger branches.
- Small hatchet: a hatchet can help you chop up small logs and also serves as a reliable splitting wedge.
- Tarp: a tarp ensures that all of your materials stay dry. It’s also one of the most valuable items you can have in a survival situation.
- Cotton balls: cotton balls make for effective fire-starters in a pinch and they hardly take up any space in your backpack.
- Vaseline: soak the cotton balls in vaseline so the flame lasts longer and you have more time to add kindling around it.
Add these tools to your outdoor adventure checklist so you’re prepared to light a fire wherever you go. You could also use chemical fire-starters to make the job more manageable, but they will hinder your progress. Learn how to start a fire with rudimentary tools before trying more advanced fire-starting methods.
Find Shelter
The first order of business is to find shelter. Look for a flat area with sufficient overhead cover and minimal winds. The tarp will help you with this task, but you should also keep your eye out for these geographical features:
- Caves, cliffs and rock overhangs: these landmarks are the best forms of shelter you can hope to find in the wilderness.
- Knocked-down trees: the base of a knocked-down tree makes an effective wall and foundation for a basic outdoor shelter.
- Spruce plants: spruce trees and shrubs have thick canopies and thus provide better shelter than most other plant groups. Their needly leaves and dead lower branches also make for great kindling.
You could also strip large pieces of bark off of nearby trees to block out the wind and rain around the flame once you light the fire. In any case, make sure you find a dry surface with dry firewood nearby.
Collect and Prepare the Wood
Once you find shelter, you need to collect and prepare the wood. The needles and dead branches from spruce trees are a good start, and these trees also provide reliable firewood:
- Red and white oak
- Hickory
- Birch
- Sugar Maple
- White Ash
- Black Locust
Regardless of the species, dead and dying trees have the driest wood you can hope to find in rainy weather. Peeling bark is a good sign of a dead tree, but you can also test a tree’s dryness by cutting a deep chip from the inside and touching the chip to your tongue. If the chip sticks to your tongue, it’s dead and dry.
In moderate weather you can get away with collecting wood from the ground, but in rainy conditions, it’s better to get your firewood from branches that haven’t touched the wet ground. Start cutting branches from a dead tree and separate the wood into three piles based on size:
- Small: this pile will contain twigs, leaves, undergrowth and any other tinder you might find.
- Medium: cut branches into roughly two-foot sections and peel off all the bark.
- Large: cut larger sections from the dead tree and baton each section with your knife and hatchet to create compact logs.
The most important thing to remember as you gather the wood is to keep your supply dry. Put the piles in the driest spot you can find and cover them with the tarp.
Build a Base
Establish your fire spot next to the three woodpiles so you can add wood quickly once the flame catches. Take some sticks from your small and medium piles and follow these steps to build your base:

- Set two thick sticks about six inches apart on the ground.
- Put four pencil-thin sticks over the base.
- Stack some tinder and a few cotton balls on top of the support sticks.
- Lay another two thick sticks across the base.
- Stack larger kindling items and a few more cotton balls over the two top sticks.
- Add a final layer of pencil-thin sticks.
- Adjust the spacing of the sticks to allow for sufficient airflow.
Once you build the base, you’re ready to start the fire. Light the initial flame on the second layer of kindling, not the first tinder layer. The elevated firebase will create a strong draft and smoke-free flame, which improves your chances of keeping the fire going.
Build the Fire
Lighting the first flame is easy, but protecting it is the real challenge. Don’t get too hasty and add bigger sticks as soon as you see the flame. Allow the fire to move through the layers of wood, then slowly hand-feed more kindling to solidify the blaze. You should also add cotton balls in places where the flame is weaker to build a more balanced fire.
Use your hands and your body to shield the fire from water and wind. You want to control the environment in the fire’s immediate vicinity as much as possible. A sudden downpour or gust of wind could ruin all of your preparations.
As you add more wood, put a few logs next to the flame so they can completely dry out. This step will come in handy later once your firewood is running low. You want those larger pieces to burn as long as possible once you throw them on.
If you’ve gotten this far, congratulations! You’ve learned how to start a fire in suboptimal conditions and added a crucial skill to your survival repertoire!
Test Out Your Fire-Starting Abilities
Starting a fire is much easier said than done. Go on an adventure and put your newfound fire-starting abilities to the test. Just remember to handle your tools safely, choose a good shelter spot and keep your firewood dry!